Posts

20 questions with The Rawsome Vegan Gal

Mindy Goldis AKA The Rawsome Vegan Gal sat us down and got the nitty gritty on what life is really like at Ozuké, the best pickled things. Hop on over to her site to find out what really makes us tick. While your at it, watch her glowing youtube review of our products here:

Cocktail Time

Bloody Mary
via Michelle Auerbach
My friend Jen is known for many things, including her enormous hospitality. When she invites you for Sunday Brunch (and often at other times) she will have a pitcher of Bloody Mary’s waiting. Hers just taste better than anyone else’s and finally this winter I found out why. Pickle juice.  Or when she is out of pickles, Kimchi juice. This twist gives a probiotic lift to an otherwise not so healthy drink, but it also adds a zing that is hard to define. It’s just good.
1 jigger vodka
1/2 teaspoon horseradish
2 shakes Worchershire sauce
1/4 teaspoon celery salt
2 Tablespoons pickle juice
1 shake Tabasco
a few grinds of black pepper
6 ounces tomato juice, no salt
Squeeze 1/4 lemon
Celery stick for garnish
Over ice
This makes one drink. You can make it by the pitcherful and then you season by taste. Hotter if you want it, more pickle juice if you want it.  All you need to do is mix all the ingredients in the glass or pitcher and serve.
Now be careful. It tastes so good that large adult men have needed designated drivers home from brunch. So either don’t make plans, or sip slowly.

My First Lime Pickle and Green Cabbage Kraut Recipe

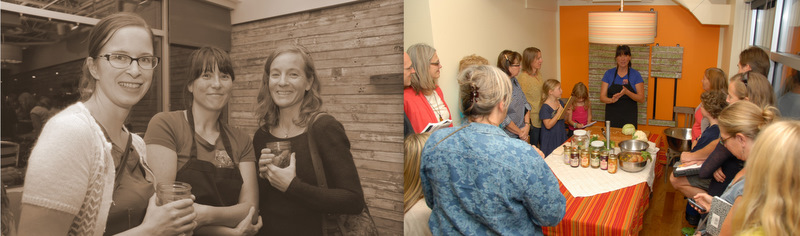
Ozuké played host yesterday to an Indian ladies group.  Chani, a member of the group runs an amazing in home Montessori preschool – Radiance Montessori, my three year old Desmond goes to her school.  She has been following my pickle factory progress for the last year and asked me to host a fermentation class for her ladies group.  Her group, the Ekta Ladies are a broad background of working moms from different age, ethnic backgrounds (Sri Lankan, Indian etc.) and occupational backgrounds.  One thing in common, they were a spicy, chatty group with plenty of jolly laughter, jokes and jibes.  Most of my classes I teach a basic sauerkraut.  Kraut is really the gateway ferment, simple with a high success rate.  I went in to this class knowing that a handful of my students came from culinary backgrounds, personal chefs and restaurant owners.  And from my own experience I find that most people from a South Asian background have very sound understanding and sophisticated application in the world of spices.  Usually I have some seasonal approach to my basic kraut however this class I showed up with just green cabbage and a pantry full of spices and I put the blending of the spices up to the group.  They came up with a brown mustard seed, serrano chile and fenugreek kraut. IMG_20140323_151737 We also put together my first ever lime pickle, inspired by a recipe from my brand new and much coveted _Permaculture Book of Ferment and Human Nutrition_ by Bill Mollison which has a most impressive collection of South Asian and South East Asian fermentation techniques and recipes as well as a bevy of sound science and fascinating traditional approaches.  We topped our class off with a mango juice water kefir and all our ladies went home with three new “friends” to tend on their countertops for the next few weeks. Please sign up for our Newsletter to find out more about classes planned for this season.

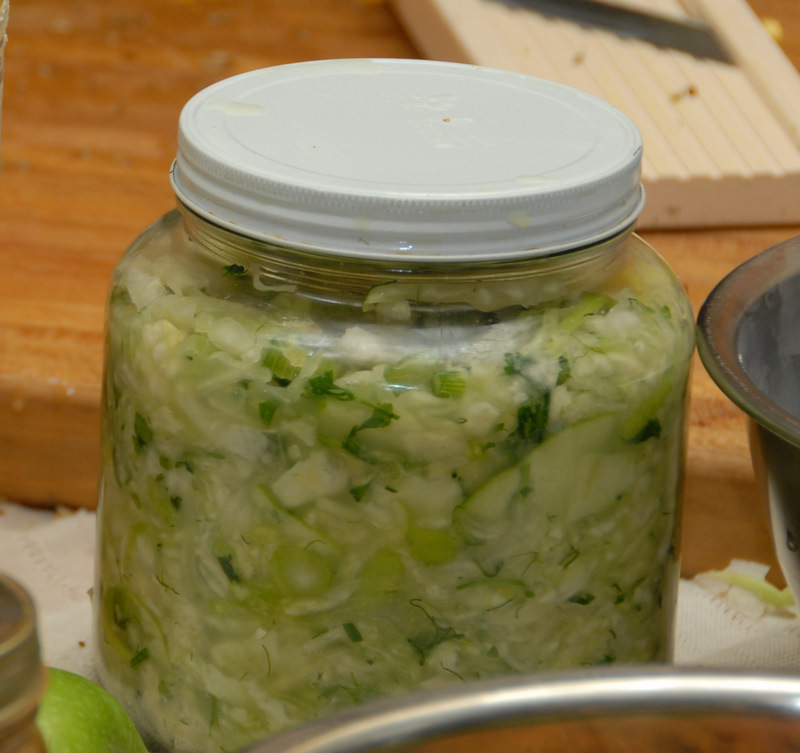
Ekta Ladies Kraut Green Cabbage

3 heads Sea Salt to taste Ground Fenugreek

1 tablespoon Serrano Chiles

about 5 diced Brown Mustard Seed

2 tablespoons

Instructions: cut cabbage into thin slices, mix in large container with salt and spices.  Then pound cabbage for about 5 minutes until it starts to release lots of juice.  Pack in to jar and push down under its own liquid.  Keep in a bright, warm spot in your kitchen.  Open every two days to release gas and to push down under its own liquid again.  It should be ready in a week or two, wait til it is good and sour and smells delicious.  Then refrigerate and enjoy. IMG_20140323_152235

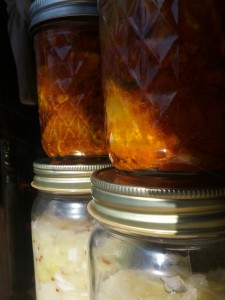
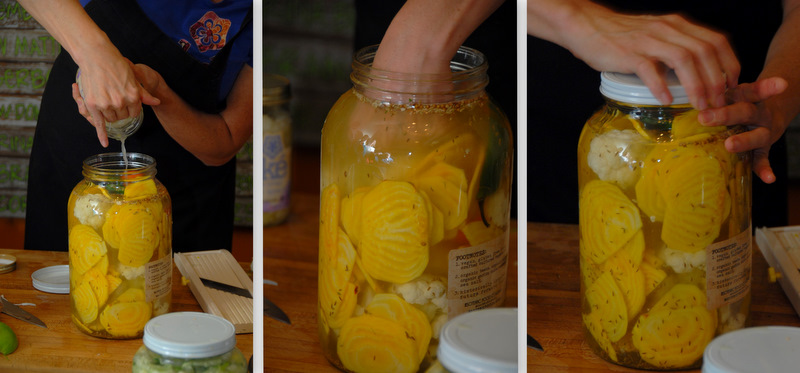
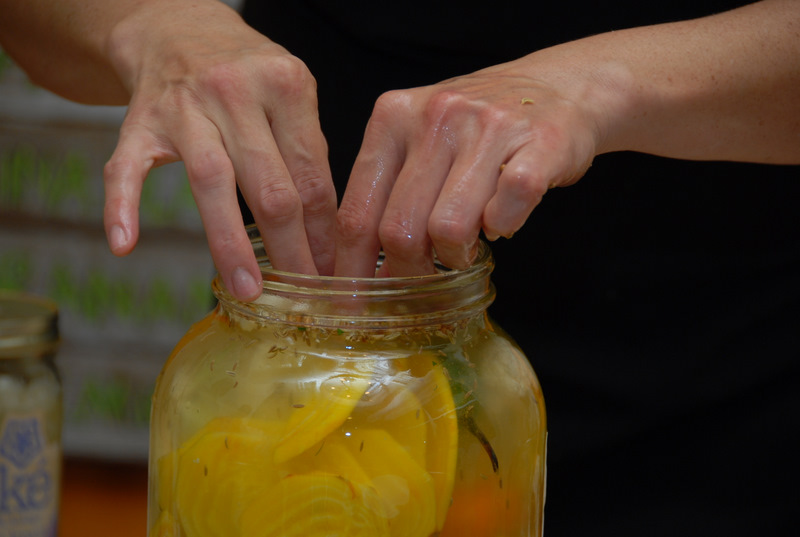
My First Lime Pickle adapted from Bill Mollison’s Punjab Stuffed Lime Pickle

20 Limes

2 heads of ginger diced small

5-10 serrano or thai bird chiles diced

12x 8 oz ball jars

1oz chile powder 1oz turmeric

2.5oz fenugreek powder 2.5oz salt

Lots of cold pressed sesame oil (I used far more than the recipe)

Instructions: Put limes whole into just boiled water and let sit for 20 minutes.  You will see the limes change color from bright green to olive. Mix the spices, ginger, chiles and salt.   Dry the limes and cut each lime into 8 pieces. (chunks). Toss limes, ginger, chile in spices and pack gently into jars.  Cover with sesame oil so that when you press the spiced limes down the oil comes up over the top.  Stand in the sun for 10 days.  Mollison says this will keep for about 6 months under oil.  I personally would refrigerate this and it will keep for longer and keep the sesame oil fresh from oxidation. (note to self – i might change this recipe next round and experiment with less oil…  Mollison’s recipe only calls for 2.5 oz of oil total…  I used a LOT more.  However the spiced oil is already DELICIOUS only one day later I ate it for lunch drizzled over leftover samosas, but traditionally there is a lot less oil in this pickle, I went for more oil because I felt this would give us a more reliable result keeping our pickle from oxidizing or molding from exposure to air).

Johnny Loves Ozuké

Last night we received one of the most enthusiastic and heart felt endorsements from our Facebook page. Interestingly we receive at least an email a week asking us if ourjumping beets ~fizzy, earthy, so alive they climb out of the jar beets are safe to eat. Something about your food rushing out to greet you has been unnerving for some folk who from experience expect a vacuum sealed lid to pop and show that everything is dead and safe and hermetically sealed. Well our beets are definitely NOT dead. They are the most live and most nutritionally dense of all our products, between the mineral and iron rich beets, the zinc and magnesium rich Maine coast harvested dulse seaweed and the blood bolstering garlic something truly magical happens. Johnny felt the magic. Here is what he said. 🙂

PS. make sure you read to the bottom there is an amazing 3 ingredient raw beet soup recipe that Johnny magicked together.~~~

jarring beets

I am slowly starting to ease into eating more fermented foods. I have a lifelong history of acute eating disorders that have caused some pretty intense damage to my body, especially my distressed digestive tract. I am a firm and faithful believer in the power of healing naturally with whole foods and know how beneficial fermented foods are to the digestive system. I recently discovered Ozuke’s sensational line of raw organic krauts at a local natural market. There were quite a few raw kraut brands to choose from but Ozuke’s really caught my attention so I went with my gut feeling and decided to give it a try. One of the first things I noticed was the amazing aroma that scented my car as I drove home. The krauts are freshly packed in air tight glass jars but the smells still seem to seep through. This made me eagerly enthusiastic to get home and dive in! The bottle will caution you to open carefully as natural explosion can happen. Do not let this scare you. You know the feeling when you pop open a bottle of bubbly on a special occasion and suds soar? Most people find this exciting as they cheerfully celebrate while they pop the top resulting in a fizzy frenzy. My reaction to opening my first jar of Ozuke beet, kale and dulse kraut was exactly this and so much more! To my surprise about 1 inch of shredded beets emerged from the top of the jar almost like it was sprouting up to shout “let’s get this party started!” Too anxious to wait, I quickly wiped up the beautiful beet splatter paint (hey, we all need some color in our lives!) and determinedly dove into deliciousness. I’m blushing to admit but I did not want to put the jar down. I was clinging to it like Winnie the Pooh to his honey pots! Everything became euphoric! The combination of sweet, salty, savory and slightly sour/tart raw-kraut-rocked my world like I was in some kind of sauerkraut sacred space with a note on the door that said, “Please do not disturb. I am in sauerkraut Heaven right now!” I say this with sincere seriousness. Nowadays I prefer to make all my own food, including homemade organic krauts, but Ozuke’s products are my new exception and obsession. I am currently hooked on their beet, dulse & kale kraut which I love using to make a dreamy & creamy fermented raw soup with 3 simple ingredients: Ozuke’s beet kraut, ripe avocado and Thai young coconut water – pureed into pure beet bliss! I am on a mission to try different krauts and start a staple stockpile of their fabulous fermented foods in my fridge! I feel it deep in my heart to share this testimonial because the outstanding owners at Ozuke are not just changing the food industry by promoting real, raw and healing foods but also changing the lives and health of others. I encourage others to embrace, enjoy and experience the nutritional cathartic healing benefits live fermented foods offer. Your health is worth it and you deserve it. Ozuke’s products are the perfect way to get your fermented food fix! You will feel the love, passion and positive energy they hand pack into every blessed jar. I cannot thank you enough Ozuke, God bless! JohnnyLovesOzukeJohnny Righini aka Mr. Sauerkraut Sassypants with his favorite Ozuke beet kraut!

Thank you Johnny for taking the time out to share your story and fizz like your favorite beets with such healthy enthusiasm.  xo

Blinking Beets & Cauliflower

Time flies when you’re having fun, doesn’t it? It was just a minute ago when Mara led a fermenting workshop. Then I blinked and it was Halloween. I blinked again and it’s almost Thanksgiving!tanner in leaves

As falls hits, the energy at my house begins to burst at the seams in anticipation of the holidays. It starts on Halloween, my boys get excited about running from house to house in costumes and collecting more candy than they will ever consume. Each year they try to finesse their trick or treating strategy by improving their running times. They start out sprinting, and by the end of the night they are dragging. The goal, of course, is to FILL their pillowcase with as much high fructose corn syrup as possible. When they were little, going to a handful of houses was adequate. Now, they can go for longer than an hour or two at full speed. It’s still not quite long enough to fill their pillowcases, but it’s plenty long enough to collect gobs of their favorite treats. They return home to sort, trade, and make plans for how each piece will be eaten and in what order. I wonder what is more fun? Trick or treating, or sorting and planning?Beets Cauliflower picklesWhen the weather is warmer, like during an Indian summer, Halloween is just that much more fun. It’s nice to be outside in the evening smelling and feeling fall. Is it the leaves turning shades of yellow, orange, red and brown that make the air smell like fall? Or is it the cooler night time temperatures? It’s probably both, and shorter daylight hours too. Either way, fall is a welcome respite from the long full days of summer. This pickled recipe of Mara’s feels like fall. She combines beautiful golden beets and creamy white cauliflower for a seasonal probiotic rich side dish.  It is fall!beets3As temperatures drop, heartier plants such as crucifers (cabbage, broccoli & cauliflower) and root vegetables begin to play a larger role in our daily diets.  They take on richer, sweeter flavors because the sugars are more concentrated in the plants. This phenomenon has also been referred to as ‘Frost Kissed’. Plus the nutritional benefit of eating these brassica vegetables is enormous.  As a group, these plants are high in vitamin C, vitamin K, folate, and cholineFolate is an essential mineral that supports healthy brain function and is important in the construction of cell membranes. Choline helps to reduce chronic inflammation and protects the liver. Eat your golds, and creamy whites! Here is Mara’s Golden pickled beets recipe.DSC_0067

Golden Pickled Beets, Cauliflower & Peppers:
1/2 Gallon spring/filtered water
2 TBSP sea salt
3 Medium golden beets, slice 1/8″ thin by hand or with mandolin
1 Head cauliflower,  larger than bite size pieces
Peppers, sliced in half (few or many, depending on desired zing)
1 tsp Coriander seed
2 tsp Fennel seed
2 tsp Cumin seed
1/2 tsp TumericRecently Updated2Directions:
Dissolve sea salt in water using a glass jar or fermenting crock.  The brine should be salty, but not overpowering. Be sure to use non-iodized salt. Trim and peel golden beets. Then slice them approximately 1/8″ thick. Break apart or cut cauliflower into florets. Slice peppers down the middle. Pack vegetables into jar or crock alternating among colors. Continue until full. Be sure all of your vegetables are fully immersed in brine. This will ensure an anaerobic environment which is necessary for fermenting.  If needed, add brine to cover vegetable mixture completely. Allow 2-3 weeks to ferment on counter top at approximately 70 degrees Fahrenheit.wet handTry these pickled treats with Tandoori chicken or other Indian spiced dishes. Of course, golden pickled beets & cauliflower would be great on a holiday antipasto platter. We hope you find the time to truly enjoy the upcoming holiday season.


Apple & Fennel Kraut

Recently, a group of folks met at Fresh Thymes Eatery (FTE) for a fall fermenting workshop led by our fearless fermento, Mara. FTE is the new Community Supported Restaurant in Boulder that features a variety of naturally fermented dishes and drinks. That’s what made it such an ideal location to hold an ozuké pickled things event. Christine Ruch, chef & owner, does a superb job of preparing real food with whole ingredients. Her menu is completely gluten free, seasonal, and locally-sourced when possible. In addition to being a great restaurant, Fresh Thymes is a community gathering spot. The friendly staff worked with the ozuké team to put together an instructive kraut making & tasting session.

group collageOnce everyone arrived, Mara began teaching us how to channel our inner pickleteer. The group was pretty diverse with kids, teens, men & women attending. The kids were as busy as the adults taking notes on fermenting techniques. For more information on fermenting and some great recipes Mara suggests The Art of Fermentation and Wild Fermentation by Sandor Katz.
lucyIt was nice to have young ones amongst us, as we hope they carry on the tradition of making naturally fermented pickled things for a long time. Plus, it’s fun just watching them enjoy delicious food, isn’t it?

In between snacking, we learned how to make a crunchy apple & fennel kraut. There was a lot of slicing, chopping, and pounding involved. Here’s Mara’s recipe:

Cabbage, Fennel & Apple KrautIngredients for Fennel & Apple Kraut:
2 Cabbage heads, medium
2 Apples, tart & firm
1 Fennel bulb, small
1 Parsley bunch, chopped
Salt to taste

Directions:
Clean and wash all vegetables. Slice cabbage, fennel, & apples into narrow strips (alternatively use a processor or mandolin). Chop parsley. Combine all ingredients in large bowl. Salt to taste and mix thoroughly. Use a mallet or meat tenderizer to pound vegetables for approximately 15 minutes. Pounding vegetables releases their natural juices. Pack kraut into jars, being sure to have the vegetable juice cover kraut mixture completely. If temperatures are warm, store approximately 3 days on counter top. If temperatures are cooler, store for as long as a week or until desired taste is reached.poundingkraut in jarThis delicious fall kraut goes well with roasted chicken and pork. It is also excellent tossed with roasted winter squash in a salad. Try this recipe and let us know what how your home ferments go. We welcome your comments and questions always.

Homemade Ginger Beer Recipe

Ginger Beer Recipe:

This is a very simple and tasty recipe on how to make ginger beer. It is very strong in ginger taste and perfect for the cocktail “Dark ‘N’ Stormy “or just drinking. You can also add half seltzer water for the folks who like a milder Ginger flavor. Below is  a cartoon of the recipe ,thanks to my fantastic mama for drawing it. A natural, classic non-alcoholic ginger beer made with fresh pressed ginger juice.

* You may have to unscrew the lid a couple of times to let the gases out if not it will explode.

Yield: 6 bottles

Prep Time: 30 minutes + 60 hours of infusing and fermentation time

Ingredients:

3/4 cups Brown Sugar
2 qts of Water
1.5 cups of Grated Ginger
2/3 cups Lime Juice,
Fresh Squeezed please it is worth it
1/4 tsp Cream of Tartar

1/4 tsp of Baker’s Yeast or Champagne Yeast

Let’s go make some ginger beer…

1.)Bring the brown sugar, water, grated ginger, cream of tartar to a boil.
2.)Place into a large jar and let sit for 24hrs.
3.)After it sat overnight strain the ginger.

4.)Heat the mixture to 65 F, then add the yeast.

Close up picture of the yeast in the ginger beer.

5.) Cover and let sit for 48 hours for maximum carbonation. Bottle if desired. If you do not have the fancy bottler I do, then just put the ginger beer in glass bottles and tighten the lid on. My mother uses repurposed glass mineral water bottles. Some of the carbonation will leak out, but it will be okay.


Make sure you chill the bottles before opening them because they will explode all over.

We enjoyed this distinctly grown up soda (it’s a bit spicy for the kids and not too sweet) with some excellent Kraken spiced rum over ice.  It was a fun center piece to a sausage making party that we threw, a sharp and warming accent to the delicious fatty sausages.

I love Ginger. I have a tendency to keep asking the sushi chef for more and when I was in Japan it was unlimited. I was eating at the sushi conveyor belt restaurant and I must of ate 1.5 cups of ginger. Within 10 minutes, I got a really bad stomach ache and could not go anywhere. It was not fun. I learned my lesson: Do not eat an excess amount of ginger!

Dorian O’Connell guest blogging for Esoteric Food Company…  see her own blog here:

click here to link to www.101sweetpastry.com

winter is a comin… Raw Salsa Recipe

The farmer’s market this weekend was a blustery affair, complete with spits of hail and rain. It was heartwarming to see all the hard core locovores, out in their wellies and wool hats, filling their market baskets with the harvest of the season. On Friday, when the air started to turn chilly, I was over at my friend Jen’s house. Jen is an amazing gardener and she was out harvesting like crazy, trying to beat the frost. My timing happened to be good- I came just as her tomatillo basket was overflowing and I got to take home some the goodness. I found this great recipe for raw salsa verde on Nourished Kitchen and adapted it just slightly to tame the spice for my kids.

  • 1 lb tomatillos (husked and halved)
  • 8 to 12 jalapeno or serrano peppers (seeded if desired and chopped)
  • 1 medium head of garlic (cloves, peeled and crushed)
  • juice of 1 lime
  • 1 tsp unrefined coarse sea salt
  • starter of choice, I like whey or kombucha
  1. Toss tomatillos, peppers, garlic, lime juice, salt and starter culture or fresh whey into a food processor or blender and process until smooth, adjusting for seasoning as necessary.
  2. Transfer the sauce to a mason jar or a vegetable fermenter  and allow to ferment at room temperature for three to five days before transferring to cold storage. Serve the salsa verde over grilled chicken or fish or as a garnish for tacos and burritos.


Video Interview: Willow Talks Pickles

Check out co-founder Willow King as she gives us the inside scoop on pickles at Zuke!

Pickled Peaches

These past few days there has been a slight crispness in the air and the fruits are hanging heavy on the trees. We went on a neighborhood walk today and picked plums, peaches, apples and buckeyes (not good for eating but good for putting in slingshots). Even though all the pickles from the Esoteric kitchen are live, raw ferments- at home, I still feel the autumn pull to put a few things up for winter. I have never tried savory peaches before, but these pickled peaches are damn good and made my Polish mother in law proud.

Sweet-and-Sour Peaches
adapted from Epicurious
  • 1 t lemon juice
  • 6 1/2 cups cold water
  • 24 firm-ripe small peaches (6 to 7 lb)
  • 1 cup sugar ( and I added about a 1/4 cup honey)
  • 1 1/4 cups distilled white vinegar
  • 4 teaspoons pickling spice
  • 1/4 teaspoon kosher salt
  • Special equipment: 6 (1-pt) canning jars with lids and screw bands; a boiling-water canner, or a deep 10- to 12-qt pot plus a flat metal rack; an instant-read thermometer

Prepare peaches:
Dissolve lemon juice in 6 cups water in a large bowl (to acidulate water).

Cut a shallow X in bottom of each peach with a sharp paring knife and blanch in 4 batches in a 5- to 6-quart pot of boiling water 10 to 15 seconds. Transfer with a slotted spoon to a large bowl of ice and cold water and let stand until cool enough to handle. Peel peaches, then halve lengthwise and pit. Add peaches to acidulated water and let stand 10 minutes, then drain well in a colander.

Toss peaches with sugar in a 6-quart wide heavy pot and chill, covered, at least 8 and up to 12 hours.

Sterilize jars and lids: I used Weck jars this year, but Ball jars are an old standby.
Wash jars, lids, and screw bands in hot soapy water, then rinse well. Dry screw bands. Put jars on rack in canner and add enough water to cover jars by 2 inches. Bring to a boil, covered, then boil 10 minutes. Cover lids with water in a small saucepan and heat until thermometer registers 180°F (do not let boil). Keep jars and lids submerged in hot water, covered, until ready to use.

Cook and can peaches:
Add vinegar, spice, salt, and remaining 1/2 cup water to peaches (sugar will have dissolved and will have drawn out peach juices) and bring to a boil over moderate heat, skimming off foam. Reduce heat and simmer until peaches are barely tender, about 3 minutes.

Remove jars and lids from water, reserving water in canner, and transfer to a clean kitchen towel, then divide peaches among jars using a slotted spoon. Return peach-cooking liquid to a boil, then pour into jars, leaving 1/4 inch of space at top. Run a thin knife between peaches and sides of jars to eliminate air bubbles.

Seal and process jars:
Wipe off rims of filled jars with a dampened kitchen towel, then firmly screw on lids with screw bands. Put sealed jars on rack in canner and, if necessary, add enough hot water to cover jars by 2 inches. Bring to a boil, covered. Boil jars 20 minutes, then transfer with tongs to a towel-lined surface to cool. Jars will seal as they cool (if you hear a ping, that signals that the vacuum formed at the top of the jar has made the lid concave).

After jars have cooled 12 to 24 hours, press center of each lid to check that it’s concave, then remove screw band and try to lift off lid with your fingertips. If you can’t, the lid has a good seal. Store in a cool dry place up to 6 months. Promptly put any jars that haven’t sealed in the refrigerator and use them first.